While configuring OpenLiteSpeed, there was an issue where logs were not being output even though the configuration was correct.
Environment : Ubuntu 24.04 / OpenLiteSpeed 1.8.2
Changed the user and group to www-data, set up several virtual hosts, and configured the virtual host logs to be output under “/usr/local/lsws/logs” with separate filenames. However, although the log files were created, no logs were written to them.
In conclusion, changing the owner/group of “/usr/local/lsws/logs” to the execution user www-data made it work.
chown -R www-data:www-data /usr/local/lsws/logs
Since the log files were being created and logs were being output to “/usr/local/lsws/logs/access.log” which was not configured, I did not think it was a permissions issue, and it took some time to resolve.
After updating Collabora Online, which was installed for NextCloud integration, from 22 to 23, the following error appeared when opening office-based files in NextCloud. (Ubuntu 22.04)
Failed to establish socket connection or socket connection closed unexpectedly.
NextCloud error
The logs of Collabora Online show no errors but the following warnings.
WRN Successfully sent ‘segfaultcount’ message segfaultcount 1 WRN Crash detected, will quarantine last version of …
Collabora Online logs
The reason was that the package “collaboraoffice” had not been updated.
To install, use the following command
apt install coolwsd code-brand
To update (upgrade), use the following command. Needed to add the package “collaboraoffice”.
apachectl restart is fine, but apachectl reload, apachectl graceful, etc. will not restart apache after stopping. It’s a bug that occurs when using opcache with mod_php.
I noticed that Apache “somehow” stopped every morning after upgrading freeBSD 13. I checked the time when it stopped, and found that it stopped when the log was rotated by “newsyslog” and when the certbot of “let’sencrypt” runs.
In “newsyslog”, the restart is done by sending a signal (30 SIGUSR1) to httpd.pid, and it seems that apachectl internally operates in the same way by sending a signal. After much Googling, I found the following bug report.
I had no choice but to remove “/var/run/httpd.pid 30”, which is the part of the “newsyslog” configuration, and set the cron to hit the following command after “newsyslog” was run.
I’m sure there are many ways to deal with this, but I decided to use the above temporary solution as a stopgap until the bug is fixed.
The certbot command was also changed to the above in the post-hook section.
I think FreeBSD Apache is the fastest for displaying websites, but the support period is too short, and if you leave it until the last minute, you will have to upgrade the OS every 3 months. It should be like ubuntu with 5 years free support and 10 years paid support.
After upgrading to FreeBSD 12.4 to 13.2, sshfs stopped working. sshfs gives the following error when mounted.
# sshfs -o allow_other,default_permissions,uid=1001,gid=1001 XXXX XXXXX
fuse: failed to open fuse device: No such file or directory
When I look at kldstat, there is no fuse.ko. I got the following error when trying to load it with kldload.
# kldload fuse.ko
kldload: can't load fuse.ko: No such file or directory
It seems that fuse.ko has been gone since 13.x and replaced by fusefs.ko. Anyway, I reinstalled fusefs-sshfs and fusefs-libs, modified /boot/loader.conf and /etc/rc.conf, and rebooted.
pkg -y install fusefs-sshfs fusefs-libs

vi /boot/loader.conf
---
# added
fusefs_load="YES"
---

vi /etc/rc.conf
---
# added
enable_fusefs="YES"
---
ssfs does work.
(It was OK to use “kldload fusefs.ko” without rebooting, but I rebooted to check the operation of the system reboot.)
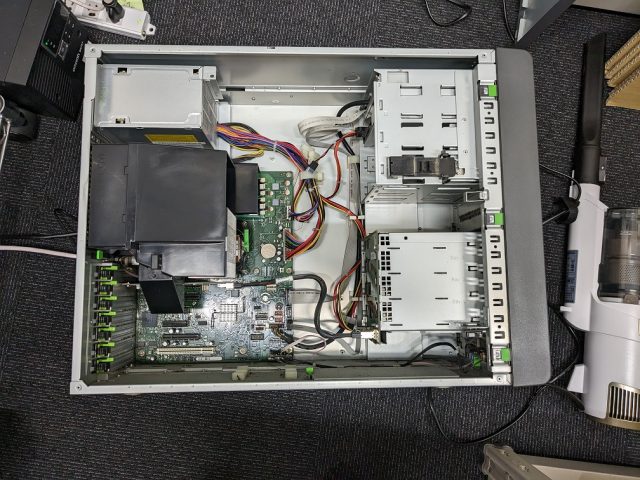
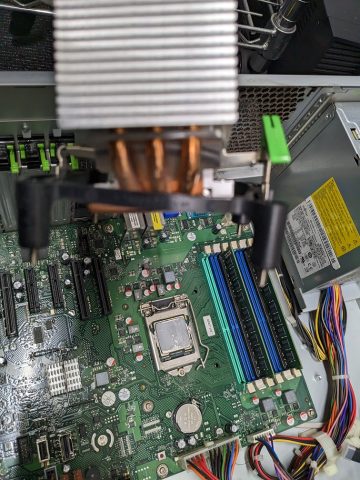
The image below shows the side panel of the server open. The design is such that each unit can be removed by moving the green part without the need to remove screws, making the work very easy.
Open Side panel!
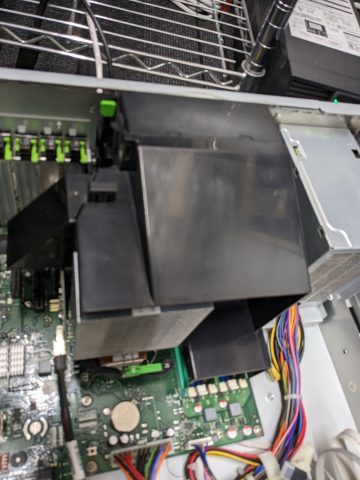
CPU fan and cooler; the CPU fan is designed to cool the memory and even the Raid card too. This is also easy to remove, just be careful with the power cable of the fan.
CPU fanCPU Cooler
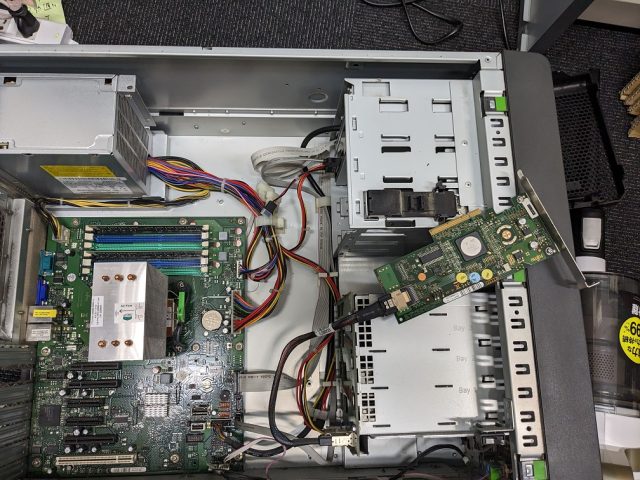
Remove the Raid card since it is in the way when removing the CPU cooler.
Raid card
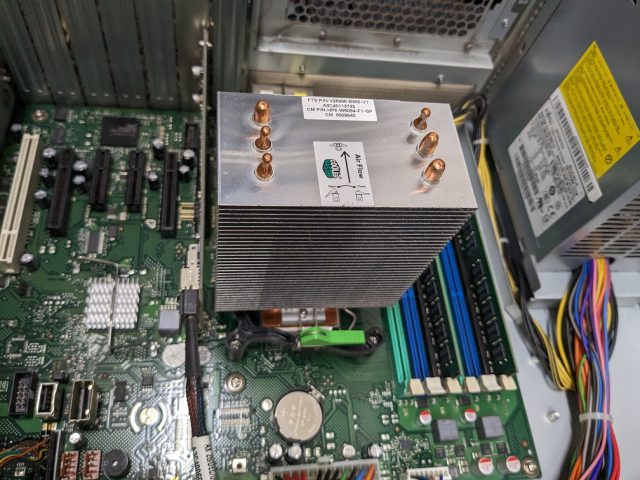
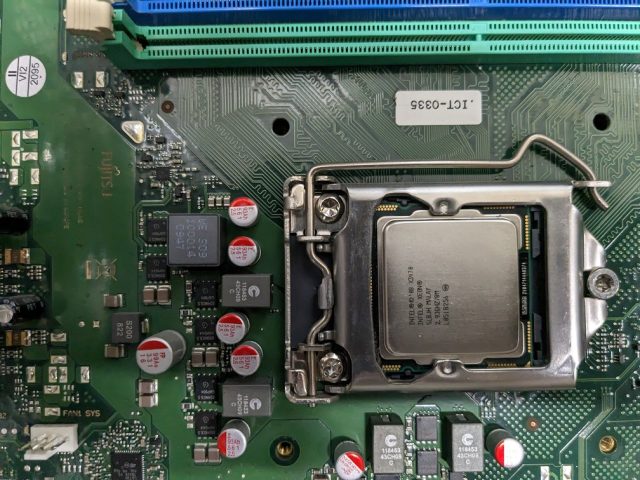
The CPU cooler removed.
CPU!
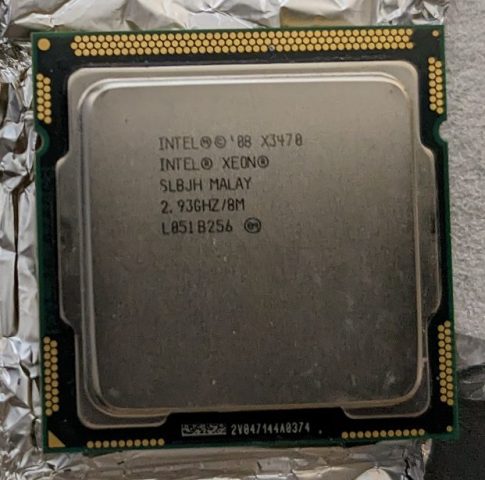
The below is XEON X3470 I bought at an internet auction, I wanted to buy X3480 but I had to pay for it myself. It was sent to me wrapped in aluminum foil. The price was 20 USD.
CPU replacement, checked, no problem.
CPU chnaged!
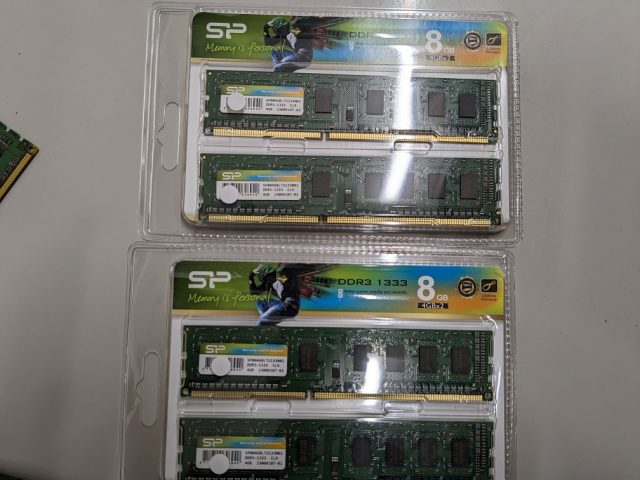
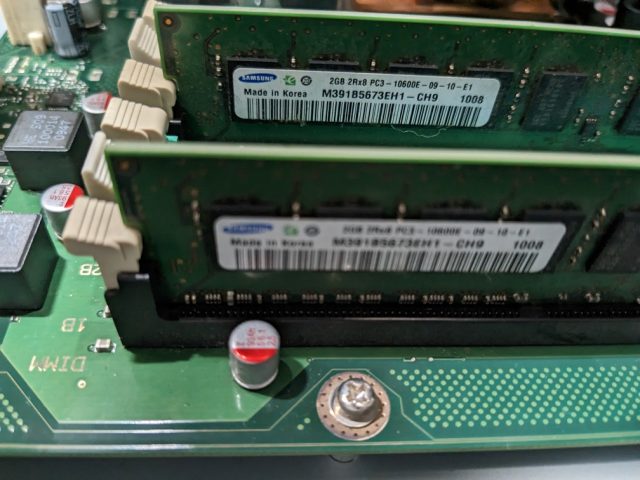
Next up was memory. The memory ended up being 8GB instead of 16GB. The spec sheet says it supports “4GB DDR3 1333 UDIMMs” I don’t know what UDIMMs are, but since they are not server RDIMMs, maybe they work with PC memory! I was happy and bought 4 new 4GB DDR3 1333 for PC for about 40 USD. It did not work. I don’t even use 4GB DDR3 1333 for PCs anymore, so when they didn’t work, they were decided to be garbage. It was a waste.
I ran out of money to buy a new one, so I bought a “4GB x 4 ECC Registered DDR3 1066” at an internet auction again for about 15 USD. I didn’t take a picture, but it didn’t work either, and was determined to be garbage again. I don’t know if the memory is bad or if it is compatible with the server, so I gave the seller the highest rating anyway.
Off topic, I inserted this memory one by one to check it works and made the mistake of pulling out the memory without turning off the power. Suddenly the power supply dropped, and I thought something had short-circuited, but it booted up again, I was relieved.
I was having trouble, so I looked for a memory with the same model number as the one currently attached and bought “2GB x 2 ECC Registered DDR3 1066” for 3 USD, including shipping fee. It worked without any problem. I was worried about the seller’s profit. Naturally, the seller was given the highest rating.
This type of memory
Since there were two slots left over, I wanted to add two more if possible to increase the capacity to 12GB, but since the specification says “UDIMM x 4, 1066 RDIMM x 4 or 1333 RDIMM x 6 can be installed,” I gave up thinking that only four cards would fit. At this point, I’ve opened the server case four times with two occurrences of waiting for the auction to arrive, and I’m sweating and cutting myself all over the place, so “It’s enogh”.
I forgot to take pictures from here on out, so I’ll just use text.
if you remove the front panel of this server and pull the handle of the HDD mounter, you can easily pull out the HDD. Great, but it only supports 3.5″. I tried to use a 2.5″ to 3.5″ conversion mounter, but it didn’t work.
Anyway, I inserted a 2.5-inch SSD into the SATA socket. So I taped the case that contained the discarded memory to the bottom of the SSD to make it taller, which solved the hanging in midair problem. That’s good enough for now.
The miscalculation was that I wanted to use hardware Raid1, but apparently the Raid card can only be controlled from Windows or Redhat. I had no choice but to use software Raid when I installed Ubuntu. 500GB 10 year old HDD seems to be running hardware Raid, so I mounted it as a backup storage.
The server was transformed into an AD server with Ubuntu + samba 4. Now working great. Thanks to Ubuntu.
Currently, our company is in the process of modifying our system to meet the Japanese invoice system that will begin on October 1, 2023. At our company, receipts from the POS and invoices sent out by the sales department to clients are subject to modification of the internal system. The rest can be handled by the package system installed by the accounting department. In addition, this modification is also being made to comply with the Electronic Bookkeeping Act of 2024, which will come after the invoice system.
The modifications are roughly as follows.
The invoices (receipts) issued should be saved and searchable (by tax collectors).
Place the firm registration number, sales date, and other legal entries on the invoice (receipt).
Issue a return invoice in case of returned goods.
Issue an “amended invoice” if the delivered invoice is amended.
2 and 3 are honestly not much of a problem. It’s just a slight change to the current receipt and invoice format.
The problem is 4, “amended invoice”. The two systemic points of the modifications of this are as follows.
Both the pre- and post-amended invoices must be kept.
Even a simple correction of a typographical error (e.g., mistaking the word “corract” for “correct” on the invoice) in a section other than the statement of legal requirements will be treated as an “amended invoice”.
In other words, after the invoice system comes into effect, when correcting any errors, the original invoice record should be kept as it is, but a new record should be added as corrected data.
This is very awkward on our system and probably awkward on many corporate systems as well.
Now, if something is wrong, we can correct the record in the system, reissue the invoice or receipt, and the corrected invoice will come up. Things are very simple and easy for everyone to understand.
In the future, records will be divided into original records and modified records, which will be difficult to understand from a practical point of view. For example, when statistics such as “amount billed this month” are collected, it will be necessary to consider whether the records are before or after modification, instead of simply adding up all records.
At first we thought it would be simpler, but the above became clear as we made inquiries to the National Tax Administration (NTA).
What is worst about this modifications is that no one benefits from this complicated system. The NTA will have enough “amended invoices” to collect taxes, and the companies will only use “amended invoices”. In short, no one will see or need the “pre-amended invoices” we have to keep.
It would be a tremendous amount of work for something that is not needed. Who needs “amended invoices,” especially for retail receipts? Not the government, not the company and not the individual need the “pre-amended invoices” but we have to keep it.
Perhaps some companies will not issue “amended invoices” even if it is a violation of the requirements of the law. Because it is foreseeable the violation will rarely be prosecuted.
However, in our case, no one wants to take an illegal risk, so we decided to follow the NTA’s answer.
Even worse is the sales department. The sales department copies the invoices generated by the system and re-writes them in Excel or by hand. They give reasons such as they need to put the company seal on the invoice, they need to conform to the customer’s format, etc., and then they say, “That’s what the customer says.” No one can resist the “the customer says so,” in our company. There are also power relationships within the company, we, IT department, has no choice but to accept the sales department’s request.
It was decided within the company that these handmade invoices would also be stored in the system, and the amount of modifications was much larger than I had originally envisioned.
At the very least, if the law had said that we didn’t have to keep the pre-amended invoices, everyone would have been happy.
I tried to runch VM.Standard.E2.1.Micro from Oracle cloud free tier as a development server, but it is very slow.
UnixBench: 504
Very slow.
So I decided to set up a second VM with OCI free tier and move the DB from the first VM to it. I thought I would add a second NIC to each VM and build a local network there, but apparently OCI is different.
I couldn’t help but think about it, so I created an instance just like first one, and in the Networking configuration place, I set => Select the same VNIC as the first one => Check Assign a public IPv4 address => Select Show advanced options => Specify an appropriate IP address for Private IP address (e.g. 10.0.0.20) Then, the first VM was able to connect to 10.0.0.20. (I don’t know why, but it is also possible to connect from the public IP I assigned.)
However, I needed to add a rule to the “ingress rule” to make a specific communication between the two servers. This time, I used mariaDB (mysql) for DB, so I specified 10.0.0.0/16 for sorce and registered it with destination Port 3306, and communication became possible.
Incidentally, since it was still slow, I did the following setting on the first VM. Then it become a usable speed.
Add swap (OCI’s ubuntu image doesn’t have swap).
Increase the number of workers of nginx and opnelitespeed. (They are too slow to handle with only a few workers.)
I use multiple development environments and use the same SSH key for all of them. This time, I copied the ssh key from Windows to the Linux environment (ChromeOS) and when I access the server using the key, I got an error “load key “/home/xxxxxx/.ssh/test03/id_rsa” : invalid format”. The result was “Permission denied (publickey).
The newline code in the key file from Windows was CRLF, and when I changed it to LF, it worked.
If you are using VIM, you can use the following commands to replace the newline codes.
:e ++ff=unix # show newline code
:%s/^M//g # ^M can be entered by pressing [Ctrl] + [V] key and then [Ctrl] + [M] key.
This post is my reminder. I spend time on the same mistake every few years.
I’ll show you a PHP code how to upload a local file and get the URL (FileID) from your NextCloud server for your reference.
/**
 * Get a internl link URL after uploading a local file.
 *
 * @param string $upFileFullPath The file Path of the file you want to upload
 * @param string $dstFolder the dstination folder path of your NextCloud environment.
 * @param string $nextCloudURL the URL of your NextCloud like "https://yourNC.com/"
 * @param string $userName Account name of your NextCloud
 * @param string $password Account password of your NextCloud
 * @return string|bool return the internal link URL. return false when error occured.
 */
function upFileAndGetInternalLink($upFileFullPath, $dstFolder, $nextCloudURL, $userName, $password){

	if (!is_file($upFileFullPath)){ return false; }
	$fileName = basename($upFileFullPath);
	if (substr($nextCloudURL, -1) != '/'){ $nextCloudURL .= '/'; }
	if (substr($dstFolder, -1) != '/'){ $dstFolder .= '/'; }

	$apiOfTheUpFile = $nextCloudURL . 'remote.php/dav/files/' . $dstFolder . $fileName;

	//libxml_use_internal_errors(true);

	$cmd = "curl -T '" . $upFileFullPath . "' -u '" . $userName . ":" . $password . "' '" . $apiOfTheUpFile . "'";
	echo $cmd;
	$ret = exec($cmd, $aryOutput, $resultCode);
	if ($ret === false || $resultCode != 0){ return false; }

	$cmd = "curl -u '" . $userName . ":" . $password . "' '" . $apiOfTheUpFile . "' -X PROPFIND --data '<?xml version="1.0" encoding="UTF-8"?>
		<d:propfind xmlns:d="DAV:">
		<d:prop xmlns:oc="http://owncloud.org/ns">
				<oc:fileid />
		</d:prop>
		</d:propfind>'";

	$ret = exec($cmd, $aryOutput, $resultCode);
	if ($ret === false || $resultCode != 0){ return false; }

	$ret = str_replace(':','',$ret);
	$xml = simplexml_load_string($ret);
	$fileId = (string)$xml->dresponse->dpropstat->dprop->ocfileid;

	return $nextCloudURL . "index.php/f/" . $fileId;

}
How to use the function
$upFileFullPath = '/td/dr/hogehoge.xlsx'; // the uploaded file name will be "hogehoge.xlsx" as same as this file name.
$nextCloudURL = 'https://yourNextCloud.com/'; // your nextcloud URL
$dstFolder = '/YourName/All/'; // $dstFolder always starts from your account name. The path is after the "data" dir of your NextCloud environment.
$userName = 'YourName';
$password = 'xH6Jk-Hkdje-OPalkd-J4PCn-mqxMW'; // app password

echo upFileAndGetInternalLink($upFileFullPath, $dstFolder, $nextCloudURL, $userName, $password);
After I updated Collabora Online, I got an error and couldn’t open office files on NextCloud.
The error is like below.
WRN  Waking up dead poll thread [HttpSynReqPoll], started: false, fin
ished: false| net/Socket.hpp:725
ERR  #30: Read failed, have 0 buffered bytes (EPIPE: Broken pipe)
ERR  #30: Socket write returned -1 (EPIPE: Broken pipe)
ERR  loading document exception: WOPI::CheckFileInfo failed:
ERR  Failed to add session to [https://hogehoge.com:443/index.
php/apps/richdocuments/wopi/files/52797_ocic20zydkap] with URI [https://hogehoge.com/index.php/apps/richdocuments/wopi/files/52797_ocic20zydkap?access_token=dcy91ZZq9mSvxv1XsGrW2ucmp8CmFcu4&access_tok
en_ttl=0]: WOPI::CheckFileInfo failed:
This「Failed to add session to」is shown when Collabora online failed to connect NextCloud server. Most cases, it’s a problem of DNS. So set-up DNS like modifying “/etc/hosts” works most cases. But this time the DNS setting was correct.
As it turns out, disabling IPv6 worked successfully.
For various reasons, the programs on my server that LISTENs the port was configured to enable only IPv4.
I didn’t know why, but I thought Collabora was trying to connect to NextCloud over IPv6 after updating.
So enabling IPv6 on NextCloud server setting might work too.
FYI, The below command temporarily disable IPv6 on Ubuntu 22.