Categories
Others IT Support

Fujitsu PRIMERGY TX150 S7 CPU/memory/Strage replacement

There is an old Fujitsu PRIMERGY TX150 S7 server at my company.

The SPEC :

CPU : XEON X3430 (4 cores 4 threads)
Memory : 4GB
Storage : HDD RAID1 500GB

Change this to below

CPU : XEON X3470 (4 cores 8 threads )
Memory : 16GB
Storage : SSD RAID1 1TB

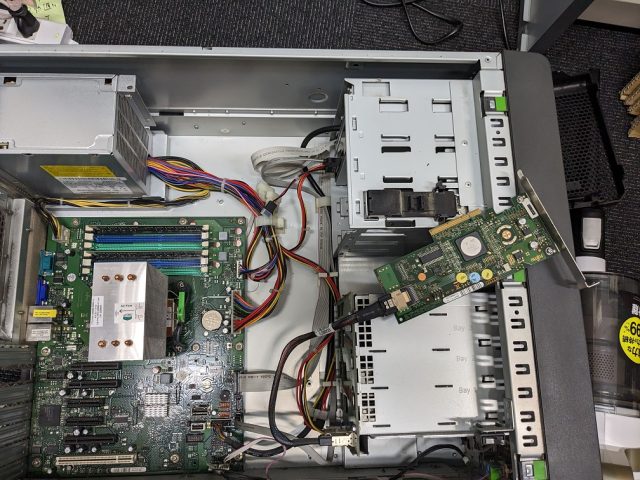
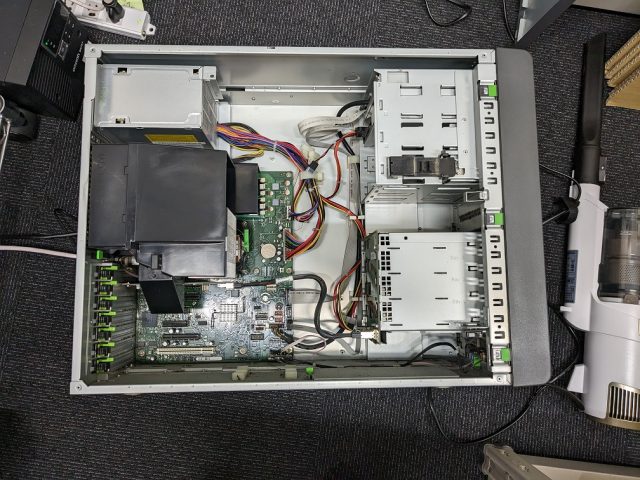
The image below shows the side panel of the server open. The design is such that each unit can be removed by moving the green part without the need to remove screws, making the work very easy.

Open Side panel!

CPU fan and cooler; the CPU fan is designed to cool the memory and even the Raid card too. This is also easy to remove, just be careful with the power cable of the fan.

CPU fan
CPU Cooler

Remove the Raid card since it is in the way when removing the CPU cooler.

Raid card

The CPU cooler removed.

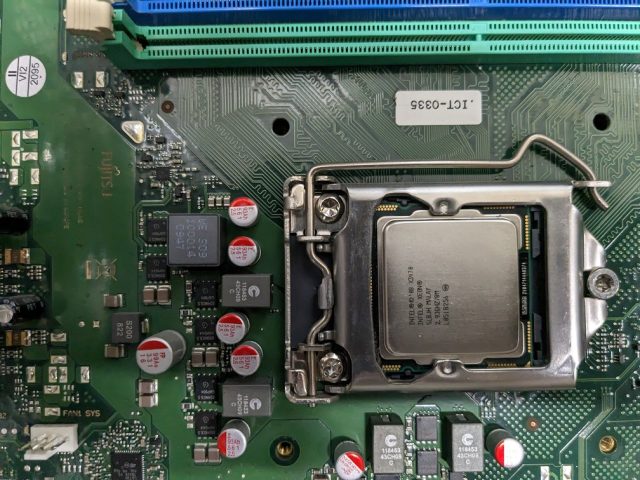
CPU!

The below is XEON X3470 I bought at an internet auction, I wanted to buy X3480 but I had to pay for it myself. It was sent to me wrapped in aluminum foil. The price was 20 USD.

CPU replacement, checked, no problem.

CPU chnaged!

Next up was memory. The memory ended up being 8GB instead of 16GB. The spec sheet says it supports “4GB DDR3 1333 UDIMMs” I don’t know what UDIMMs are, but since they are not server RDIMMs, maybe they work with PC memory! I was happy and bought 4 new 4GB DDR3 1333 for PC for about 40 USD. It did not work. I don’t even use 4GB DDR3 1333 for PCs anymore, so when they didn’t work, they were decided to be garbage. It was a waste.

I ran out of money to buy a new one, so I bought a “4GB x 4 ECC Registered DDR3 1066” at an internet auction again for about 15 USD. I didn’t take a picture, but it didn’t work either, and was determined to be garbage again. I don’t know if the memory is bad or if it is compatible with the server, so I gave the seller the highest rating anyway.

Off topic, I inserted this memory one by one to check it works and made the mistake of pulling out the memory without turning off the power. Suddenly the power supply dropped, and I thought something had short-circuited, but it booted up again, I was relieved.

I was having trouble, so I looked for a memory with the same model number as the one currently attached and bought “2GB x 2 ECC Registered DDR3 1066” for 3 USD, including shipping fee. It worked without any problem. I was worried about the seller’s profit. Naturally, the seller was given the highest rating.

This type of memory

Since there were two slots left over, I wanted to add two more if possible to increase the capacity to 12GB, but since the specification says “UDIMM x 4, 1066 RDIMM x 4 or 1333 RDIMM x 6 can be installed,” I gave up thinking that only four cards would fit. At this point, I’ve opened the server case four times with two occurrences of waiting for the auction to arrive, and I’m sweating and cutting myself all over the place, so “It’s enogh”.

I forgot to take pictures from here on out, so I’ll just use text.

if you remove the front panel of this server and pull the handle of the HDD mounter, you can easily pull out the HDD. Great, but it only supports 3.5″. I tried to use a 2.5″ to 3.5″ conversion mounter, but it didn’t work.

Anyway, I inserted a 2.5-inch SSD into the SATA socket. So I taped the case that contained the discarded memory to the bottom of the SSD to make it taller, which solved the hanging in midair problem. That’s good enough for now.

The miscalculation was that I wanted to use hardware Raid1, but apparently the Raid card can only be controlled from Windows or Redhat. I had no choice but to use software Raid when I installed Ubuntu. 500GB 10 year old HDD seems to be running hardware Raid, so I mounted it as a backup storage.

The server was transformed into an AD server with Ubuntu + samba 4. Now working great. Thanks to Ubuntu.

Categories
Others IT Support

System modification : Summary of Japanese Invoice System

Currently, our company is in the process of modifying our system to meet the Japanese invoice system that will begin on October 1, 2023. At our company, receipts from the POS and invoices sent out by the sales department to clients are subject to modification of the internal system. The rest can be handled by the package system installed by the accounting department. In addition, this modification is also being made to comply with the Electronic Bookkeeping Act of 2024, which will come after the invoice system.

The modifications are roughly as follows.

  1. The invoices (receipts) issued should be saved and searchable (by tax collectors).
  2. Place the firm registration number, sales date, and other legal entries on the invoice (receipt).
  3. Issue a return invoice in case of returned goods.
  4. Issue an “amended invoice” if the delivered invoice is amended.

2 and 3 are honestly not much of a problem. It’s just a slight change to the current receipt and invoice format.

The problem is 4, “amended invoice”. The two systemic points of the modifications of this are as follows.

  • Both the pre- and post-amended invoices must be kept.
  • Even a simple correction of a typographical error (e.g., mistaking the word “corract” for “correct” on the invoice) in a section other than the statement of legal requirements will be treated as an “amended invoice”.

In other words, after the invoice system comes into effect, when correcting any errors, the original invoice record should be kept as it is, but a new record should be added as corrected data.

This is very awkward on our system and probably awkward on many corporate systems as well.

Now, if something is wrong, we can correct the record in the system, reissue the invoice or receipt, and the corrected invoice will come up. Things are very simple and easy for everyone to understand.

In the future, records will be divided into original records and modified records, which will be difficult to understand from a practical point of view. For example, when statistics such as “amount billed this month” are collected, it will be necessary to consider whether the records are before or after modification, instead of simply adding up all records.

At first we thought it would be simpler, but the above became clear as we made inquiries to the National Tax Administration (NTA).

What is worst about this modifications is that no one benefits from this complicated system. The NTA will have enough “amended invoices” to collect taxes, and the companies will only use “amended invoices”. In short, no one will see or need the “pre-amended invoices” we have to keep.

It would be a tremendous amount of work for something that is not needed. Who needs “amended invoices,” especially for retail receipts? Not the government, not the company and not the individual need the “pre-amended invoices” but we have to keep it.

Perhaps some companies will not issue “amended invoices” even if it is a violation of the requirements of the law. Because it is foreseeable the violation will rarely be prosecuted.

However, in our case, no one wants to take an illegal risk, so we decided to follow the NTA’s answer.

Even worse is the sales department. The sales department copies the invoices generated by the system and re-writes them in Excel or by hand. They give reasons such as they need to put the company seal on the invoice, they need to conform to the customer’s format, etc., and then they say, “That’s what the customer says.” No one can resist the “the customer says so,” in our company. There are also power relationships within the company, we, IT department, has no choice but to accept the sales department’s request.

It was decided within the company that these handmade invoices would also be stored in the system, and the amount of modifications was much larger than I had originally envisioned.

At the very least, if the law had said that we didn’t have to keep the pre-amended invoices, everyone would have been happy.

Categories
Others IT Support

OCI Free tier : How to connect the local network of the 1st VM from 2nd VM

I tried to runch VM.Standard.E2.1.Micro from Oracle cloud free tier as a development server, but it is very slow.

UnixBench: 504

Very slow.

So I decided to set up a second VM with OCI free tier and move the DB from the first VM to it. I thought I would add a second NIC to each VM and build a local network there, but apparently OCI is different.

I couldn’t help but think about it, so I created an instance just like first one, and in the Networking configuration place, I set
 => Select the same VNIC as the first one
 => Check Assign a public IPv4 address
 => Select Show advanced options
 => Specify an appropriate IP address for Private IP address (e.g. 10.0.0.20)
Then, the first VM was able to connect to 10.0.0.20. (I don’t know why, but it is also possible to connect from the public IP I assigned.)

However, I needed to add a rule to the “ingress rule” to make a specific communication between the two servers. This time, I used mariaDB (mysql) for DB, so I specified 10.0.0.0/16 for sorce and registered it with destination Port 3306, and communication became possible.

Incidentally, since it was still slow, I did the following setting on the first VM. Then it become a usable speed.

  • Add swap (OCI’s ubuntu image doesn’t have swap).
  • Increase the number of workers of nginx and opnelitespeed. (They are too slow to handle with only a few workers.)
  • Stop unused services.
Categories
Others IT Support

Solved : Connection error of Collabora Online “Failed to add session to XXXX”

After I updated Collabora Online, I got an error and couldn’t open office files on NextCloud.

The error is like below.

WRN  Waking up dead poll thread [HttpSynReqPoll], started: false, fin
ished: false| net/Socket.hpp:725
ERR  #30: Read failed, have 0 buffered bytes (EPIPE: Broken pipe)
ERR  #30: Socket write returned -1 (EPIPE: Broken pipe)
ERR  loading document exception: WOPI::CheckFileInfo failed:
ERR  Failed to add session to [https://hogehoge.com:443/index.
php/apps/richdocuments/wopi/files/52797_ocic20zydkap] with URI [https://hogehoge.com/index.php/apps/richdocuments/wopi/files/52797_ocic20zydkap?access_token=dcy91ZZq9mSvxv1XsGrW2ucmp8CmFcu4&access_tok
en_ttl=0]: WOPI::CheckFileInfo failed:

This「Failed to add session to」is shown when Collabora online failed to connect NextCloud server. Most cases, it’s a problem of DNS. So set-up DNS like modifying “/etc/hosts” works most cases. But this time the DNS setting was correct.

As it turns out, disabling IPv6 worked successfully.

For various reasons, the programs on my server that LISTENs the port was configured to enable only IPv4.

I didn’t know why, but I thought Collabora was trying to connect to NextCloud over IPv6 after updating.

So enabling IPv6 on NextCloud server setting might work too.

FYI, The below command temporarily disable IPv6 on Ubuntu 22.

sysctl -w net.ipv6.conf.all.disable_ipv6=1
sysctl -w net.ipv6.conf.default.disable_ipv6=1
sysctl -w net.ipv6.conf.lo.disable_ipv6=1

The below is permanently disable IPv6.

vi /etc/sysctl.d/60-custom.conf
---
net.ipv6.conf.all.disable_ipv6 = 1
net.ipv6.conf.default.disable_ipv6 = 1
net.ipv6.conf.lo.disable_ipv6 = 1
--

sysctl -p
systemctl restart procps

Categories
Others IT Support

Install NextCloud & collabora online on openLiteSpeed

The bellow is how to set up Nextcloud and collabora online on openLiteSpeed. If you are having trouble with slow Nextcloud, this aricle might be helpfull.

Setup Environment

  • OS Ubuntu 22.04
  • NextCloud 24.04
  • OpenLiteSpeed 1.7 + PHP 8.1
  • Collabora Online 22
  • SSL LetsEncrypt

Quick Point

  • Increase the number of “num_prespawn_children” in the config xml file of Collabora Online. Also setup only work with IPv4 with “net.proto” value. (Collabora Online works behind openLiteSpeed and the connection between the both program only use IPv4. So IPv6 doesn’t needed.)
  • Generate .htaccess file of NextCloud with the command “occ maintenance:update:htaccess”. And setup rewrite rules of openLiteSpeed from the rewrite section of the generated .htaccess file.
  • Set up collabora Online as a backend server of openLiteSpeed Reverse Proxy.

Prerequisites

  • OS is installed.
  • mariaDB is installed and done initial setup.
  • This article set up below site.
    NextCloud https://nc.you.com/
    Collabora Online https://lool.you.com/

    When referring to the site, please replace them with the names of your own site.

Initial setting

DB : Create a database for NextCloud in your DB environment

CREATE DATABASE nc;
CREATE USER 'nextcloud'@'127.0.0.1' IDENTIFIED BY 'yourPassWord';
GRANT ALL ON nc.* TO 'nc'@'127.0.0.1';

FLUSH PRIVILEGES;

Change the linux user to root

sudo su -

Change hosts

vi /etc/hosts
---
127.0.0.1 localhost nc.you.com lool.you.com
127.0.1.1 nc.you.com lool.you.com
---

Install Redis

apt install redis-server -y

vi /etc/redis/redis.conf
---
supervised systemd
maxmemory 16mb
maxmemory-policy volatile-lfu
unixsocket /var/run/redis/redis-server.sock
unixsocketperm 777
timeout 60
---

usermod -a -G redis www-data

systemctl enable redis-server
systemctl restart redis.service
systemctl status redis-server

Install other programs if not installed

apt install -y cron vim build-essential
systemctl start cron
systemctl enable cron

OpenLiteSpeed Port 80 + LetsEncrypt

Install OpenLiteSpeed + php 8.1

wget -O - https://repo.litespeed.sh > enable_lst_debian_repo.sh
bash enable_lst_debian_repo.sh

apt update
apt install openlitespeed -y

systemctl status lshttpd
systemctl enable lshttpd
systemctl start lshttpd

# public folders for http
mkdir /var/www/{nextcloud,80}
chown -R www-data:www-data /var/www/

# folders of the virtual host config files
mkdir -p /usr/local/lsws/conf/vhosts/{nextcloud,httpPort,loolProxy}
chown www-data:www-data /usr/local/lsws/conf/vhosts/{nextcloud,httpPort,loolProxy}

# root folders of vertual hosts
mkdir -p /usr/local/lsws/vhosts/{nextcloud,httpPort,loolProxy}
chown www-data:www-data /usr/local/lsws/vhosts/{nextcloud,httpPort,loolProxy}

# PHP 8.1 
apt install -y lsphp81 lsphp81-curl lsphp81-dev lsphp81-mysql lsphp81-redis lsphp81-apcu lsphp81-intl lsphp81-imagick

# to use php-imagick function fully
apt install -y libmagickcore-6.q16-6-extra

# main config file. The below shows only changed lines.
vi /usr/local/lsws/conf/httpd_config.conf
---
serverName                        nc.you.com
#user                             nobody
#group                            nogroup
user                             www-data
group                            www-data
#indexFiles                       index.html, index.php
indexFiles                       index.html, index.php, index.htm
#path                    lsphp73/bin/lsphp
path                    lsphp81/bin/lsphp
---

# re-install. you need this command when changed user and group.
apt -y install --reinstall openlitespeed

# set admin password 
/usr/local/lsws/admin/misc/admpass.sh

User name [admin]: your Name

Password: yourPassword
Retype password: yourPassword

# make ram disk
mkdir /tmp/ram
mount -t tmpfs -o size=8m /dev/shm /tmp/ram

vi /etc/fstab
---
tmpfs /tmp/ram tmpfs defaults,noatime,size=8m 0 0
---

# php setting. The below shows only chnaged (or added) lines.
vi /usr/local/lsws/lsphp81/etc/php/8.1/litespeed/php.ini
---
memory_limit = 512M
upload_max_filesize = 64M
max_file_uploads = 100
post_max_size = 40M
output_buffering = Off

date.timezone = "Asia/Tokyo"

[Pdo_mysql]
# the below is depend on you environment
pdo_mysql.default_socket = /var/run/mysqld/mysqld.sock

[opcache]
opcache.enable=1
opcache.enable_cli=1
opcache.interned_strings_buffer=32
opcache.max_accelerated_files=1000
opcache.memory_consumption=128
opcache.save_comments=1
opcache.revalidate_freq=1

opcache.jit=on
opcache.jit_buffer_size=128M

apc.enabled=1
apc.enable_cli = 1
apc.shm_size=64M
apc.ttl=3600
apc.gc_ttl=3600
---

# nobody user folder. will be made by www-date user automatically.
rm -rf /tmp/lshttpd

# openLiteSpeed admin panel setting 
vi /usr/local/lsws/admin/conf/admin_config.conf
---
# change below seciotn like this.
listener adminListener {
  address               *:7080
  secure                0
  keyFile                 /etc/letsencrypt/live/nc.you.com/privkey.pem
  certFile                /etc/letsencrypt/live/nc.you.com/fullchain.pem
  clientVerify          0
}
---

systemctl restart lshttpd

# to use php 8.1 easily 
su - www-data
vi ~/.bash_profile
---
if [ -f ~/.bashrc ]; then
        . ~/.bashrc
fi
---

vi ~/.bashrc
---
alias lsphp='/usr/local/lsws/lsphp81/bin/php -c /usr/local/lsws/lsphp81/etc/php/8.1/litespeed/php.ini'
---
source ~/.bashrc
exit

# also root user
vi ~/.bashrc
---
# 以下1行を追加
alias lsphp='/usr/local/lsws/lsphp81/bin/php -c /usr/local/lsws/lsphp81/etc/php/8.1/litespeed/php.ini'
---
source ~/.bashrc

Set up http port 80. (It can also be configured on the admin panel  http://nc.you.com:7080/ )

vi /usr/local/lsws/conf/httpd_config.conf
---
# Add below section
virtualhost httpPort {
  vhRoot                  $SERVER_ROOT/vhosts/$VH_NAME/
  configFile              $SERVER_ROOT/conf/vhosts/$VH_NAME/vhconf.conf
  allowSymbolLink         1
  enableScript            0
  restrained              1
}
# Change below setion like this
listener Default {
  address                 *:80
  secure                  0
  map                     httpPort nc.you.com, lool.you.com
}
---

# make new file
vi /usr/local/lsws/conf/vhosts/httpPort/vhconf.conf
---
docRoot                   /var/www/80/

errorlog $SERVER_ROOT/logs/$VH_NAME_error.log {
  useServer               0
  logLevel                ERROR
  rollingSize             10k
  keepDays                90
}

accesslog $SERVER_ROOT/logs/$VH_NAME_access.log {
  useServer               0
  logFormat               %h %l %u %t "%r" %>s %b "%{Referer}i" "%{User-Agent}i"
  rollingSize             10k
  keepDays                90
}
---
chown lsadm:www-data /usr/local/lsws/conf/vhosts/httpPort/vhconf.conf

LetsEncrypt

apt install certbot -y

# get the SSL certificate. Dont forget to change the e-mail address to your own one.
certbot certonly --non-interactive --agree-tos -m yourmail@mail.com --webroot -w /var/www/80/ -d nc.you.com -d lool.you.com

vi /etc/cron.d/certbot
---
# change
#0 */12 * * * root test -x /usr/bin/certbot -a ! -d /run/systemd/system && perl -e 'sleep int(rand(43200))' && certbot -q renew
0 */12 * * * root test -x /usr/bin/certbot -a ! -d /run/systemd/system && perl -e 'sleep int(rand(43200))' && certbot -q renew --deploy-hook "systemctl restart lshttpd"
---

openlitespeed global setting

To access https://nc.you.com:7080/

vi /usr/local/lsws/admin/conf/admin_config.conf
---
# change this section like below
listener adminListener {
  address               *:7080
  secure                1
  keyFile                 /etc/letsencrypt/live/nc.you.com/privkey.pem
  certFile                /etc/letsencrypt/live/nc.you.com/fullchain.pem
  clientVerify          0
}
---

Change the global setting.

# The below shows only chnaged (or added) lines.
vi /usr/local/lsws/conf/httpd_config.conf
---
# add below line around top global section around user / group setting
statDir                   /tmp/ram/

# change below line and add one line of autoIndex,
indexFiles                index.html, index.phpi, index.htm
autoIndex                 0

# change this secion's maxConns and env
extprocessor lsphp {
  maxConns                200
  env                     PHP_LSAPI_CHILDREN=200
  env                     LSAPI_AVOID_FORK=200M
}
---

Install NextCloud

Download and put it on the public folder.

mkdir ~/src/
cd ~/src/

# Check the nextcloud site to chose the latest version. the below is the example of version 24.0.4.
wget https://download.nextcloud.com/server/releases/nextcloud-24.0.4.tar.bz2
tar xf nextcloud-24.0.4.tar.bz2
cp -r ./nextcloud/. /var/www/nextcloud/

mkdir /var/www/nextcloud/{data,.well-known}
mkdir /var/www/nextcloud/.well-known/{carddav,caldav,webfinger,nodeinfo}

chown -R www-data:www-data /var/www/nextcloud/

NextCloud config file setting

vi /var/www/nextcloud/config/config.php
---
# the below is only changed (or added) line. Don't erase other lines
$CONFIG = array (
  'memcache.local' => '\OC\Memcache\APCu',
  'memcache.distributed' => '\OC\Memcache\Redis',
  'redis' =>
  array (
    'host' => '/var/run/redis/redis-server.sock',
    'port' => 0,
    'timeout' => 0.0,
  ),
  'memcache.locking' => '\OC\Memcache\Redis',
  'overwrite.cli.url' => 'https://nc.you.com/',
  'htaccess.RewriteBase' => '/',
---

re-generate .htaccess file.

su - www-data
lsphp /var/www/nextcloud/occ maintenance:update:htaccess
exit

Open the /var/www/nextcloud/.htaccess file and check the <IfModule mod_rewrite.c> sections. (There is more then two secions of “mod_rewrite.c”)
Move the contents of the sections to [rewrite]=>[rules] setting of the virtual host setting of OpenLiteSpeed. Please refere the section in the below virtual host setting. Also, change RewriteRule prefixes with ^ to ^/. Only for .htaccess, the description rules are slightly different from those of Apache.

NextCloud virtual host setting of OpenLiteSpeed

vi /usr/local/lsws/conf/httpd_config.conf
---
# add below sections
virtualhost nextcloud {
  vhRoot                  $SERVER_ROOT/vhosts/$VH_NAME/
  configFile              $SERVER_ROOT/conf/vhosts/$VH_NAME/vhconf.conf
  allowSymbolLink         1
  enableScript            1
  restrained              1
}

listener nextcloud {
  address                 *:443
  secure                  1
  keyFile                 /etc/letsencrypt/live/nc.you.com/privkey.pem
  certFile                /etc/letsencrypt/live/nc.you.com/fullchain.pem
  map                     nextcloud nc.you.com
}
---
# make this file
vi /usr/local/lsws/conf/vhosts/nextcloud/vhconf.conf
---
docRoot                   /var/www/nextcloud/
enableGzip                1

errorlog $SERVER_ROOT/logs/nextcloud_error.log {
  useServer               0
  logLevel                ERROR
  rollingSize             10M
  keepDays                30
}

accesslog $SERVER_ROOT/logs/nextcloud_access.log {
  useServer               0
  logFormat               %h %l %u %t "%r" %>s %b "%{Referer}i" "%{User-Agent}i"
  rollingSize             10M
  keepDays                30
}

index  {
  useServer               0
}
errorpage 403 {
  url                     /
}

errorpage 404 {
  url                     /
}
context / {
  allowBrowse             1
  extraHeaders            Strict-Transport-Security "max-age=15552000; includeSubDomains;preload"

  rewrite  {

  }
  addDefaultCharset       off

  phpIniOverride  {

  }
}
rewrite  {
  enable                  1
  autoLoadHtaccess        0
  rules                   <<<END_rules
RewriteRule ^/data/.*$ - [F,L]
RewriteRule ^/config/.*$ - [F,L]
# add below from .htacccess file. erase this comment line. i dont kwno how to comment.
RewriteCond %{HTTP_USER_AGENT} DavClnt
RewriteRule ^$ /remote.php/webdav/ [L,R=302]
RewriteRule .* - [env=HTTP_AUTHORIZATION:%{HTTP:Authorization}]
RewriteRule ^/.well-known/carddav /remote.php/dav/ [R=301,L]
RewriteRule ^/.well-known/caldav /remote.php/dav/ [R=301,L]
RewriteRule ^/remote/(.*) remote.php [QSA,L]
RewriteRule ^/(?:build|tests|config|lib|3rdparty|templates)/.* - [R=404,L]
RewriteRule ^/.well-known/(?!acme-challenge|pki-validation) /index.php [QSA,L]
RewriteRule ^/(?:.(?!well-known)|autotest|occ|issue|indie|db_|console).* - [R=404,L]

RewriteRule ^/core/js/oc.js$ index.php [PT,E=PATH_INFO:$1]
RewriteRule ^/core/preview.png$ index.php [PT,E=PATH_INFO:$1]
RewriteCond %{REQUEST_FILENAME} !.(css|js|svg|gif|png|html|ttf|woff2?|ico|jpg|jpeg|map|webm|mp4|mp3|ogg|wav|wasm|tflite)$
RewriteCond %{REQUEST_FILENAME} !/core/ajax/update.php
RewriteCond %{REQUEST_FILENAME} !/core/img/(favicon.ico|manifest.json)$
RewriteCond %{REQUEST_FILENAME} !/(cron|public|remote|status).php
RewriteCond %{REQUEST_FILENAME} !/ocs/v(1|2).php
RewriteCond %{REQUEST_FILENAME} !/robots.txt
RewriteCond %{REQUEST_FILENAME} !/(ocm-provider|ocs-provider|updater)/
RewriteCond %{REQUEST_URI} !^/.well-known/(acme-challenge|pki-validation)/.*
RewriteCond %{REQUEST_FILENAME} !/richdocumentscode(_arm64)?/proxy.php$
RewriteRule . index.php [PT,E=PATH_INFO:$1]
  END_rules
}
---

# check the config files
/usr/local/lsws/bin/openlitespeed -t

systemctl restart lshttpd

Install Collabola Online

Install it.

cd /usr/share/keyrings
sudo wget https://collaboraoffice.com/downloads/gpg/collaboraonline-release-keyring.gpg

# make a file
vi /etc/apt/sources.list.d/collaboraonline.sources
---
Types: deb
URIs: https://www.collaboraoffice.com/repos/CollaboraOnline/CODE-ubuntu2204
Suites: ./
Signed-By: /usr/share/keyrings/collaboraonline-release-keyring.gpg
---

# install
apt update
apt install coolwsd code-brand -y

# setting
loolconfig set ssl.enable false
loolconfig set ssl.termination true
loolconfig set storage.wopi.host nc.you.com
loolconfig set server_name lool.you.com

# set admin password
loolconfig set-admin-password

# change the setting file
vi /etc/coolwsd/coolwsd.xml
---
# change the following three setting
# net.proto => IPv4 
# num_prespawn_children => 10
# allowed_languages => en_US
---

systemctl enable coolwsd
systemctl start coolwsd

# check the status
systemctl status coolwsd

virtual host setting of OpenLiteSpeed (reverse proxy with websocket.)

vi /usr/local/lsws/conf/httpd_config.conf
---
# add below section
virtualhost loolProxy {
  vhRoot                  $SERVER_ROOT/vhosts/$VH_NAME/
  configFile              $SERVER_ROOT/conf/vhosts/$VH_NAME/vhconf.conf
  allowSymbolLink         1
  enableScript            1
  restrained              1
}

# change below seciton (add last one line )
listener nextcloud {
  address                 *:443
  secure                  1
  keyFile                 /etc/letsencrypt/live/nc.you.com/privkey.pem
  certFile                /etc/letsencrypt/live/nc.you.com/fullchain.pem
  map                     nextcloud nc.you.com
  map                     loolProxy lool.you.com  
}
---

# make this file
vi /usr/local/lsws/conf/vhosts/loolProxy/vhconf.conf
---
docRoot                   /var/www/80

errorlog $SERVER_ROOT/logs/$VH_NAME_error.log {
  useServer               0
  logLevel                ERROR
  rollingSize             10M
  keepDays                30
}

accesslog $SERVER_ROOT/logs/$VH_NAME_access.log {
  useServer               0
  logFormat               %h %l %u %t "%r" %>s %b "%{Referer}i" "%{User-Agent}i"
  rollingSize             10M
  keepDays                30
}

extprocessor lool {
  type                    proxy
  address                 127.0.0.1:9980
  maxConns                100
  pcKeepAliveTimeout      60
  initTimeout             60
  retryTimeout            0
  respBuffer              0
}

context / {
  type                    proxy
  handler                 lool
  addDefaultCharset       off
}

websocket / {
  address                 127.0.0.1:9980
}
---

# check the config files
/usr/local/lsws/bin/openlitespeed -t

systemctl restart lshttpd

In the end

Access https://nc.you.com/ and do initial setting. After login with admin account on your NextCloud, Set up [office] section of setting and cheking “Use you own server” and put the server URL “https://lool.you.com/”.

Next cloud and Collabora online will be work with above settings.
Categories
Others IT Support

Configuration of vscode server on a public server

The server version of Visual Studio code has been officially released in preview so I set up it on my VPS server with SSL and Basic/Client authentication.
And I registered vscode server as a systemd service to run vscode server on boot.

Now I can edit any files on the server from anywhere anytime with a browser.

How to set up (Using Ubuntu 20.04)

Nginx is configured as a reverse proxy for the front end, SSL and other security are applied on the Nginx, and vscode server itself is used as the back end. You don’t use Apache as a reverse proxy because the websockets will not pass through correctly.

Visual Studio code server : install and set up

Install as described officially and create a systemd file to register as a service.

# install
wget -O- https://aka.ms/install-vscode-server/setup.sh | sh

# make a systemd unit file
# vscode server will be run on the User/Group you set up in this file.
# Don't forget changing the User/Group of your environment.
sudo vi /lib/systemd/system/vscodeserver.service
---
[Unit]
Description=vs code server
After=network-online.target

[Service]
ExecStart=/usr/local/bin/code-server serve-local --accept-server-license-terms --disable-telemetry
Restart=always
User=yourUserName
Group=yourGroupName
UMask=002

[Install]
WantedBy=multi-user.target
---

Register the unit file with systemd and run it.

# 登録
sudo systemctl enable vscodeserver
# 開始
sudo systemctl start vscodeserver

Wait for a minute or two and obtain the URL of the connection destination that is displayed on the status after the startup.
Only fist time, it takes a minute or two to start up. It start immediately after second time.

# Get the URL from thee line "Web UI available at"
sudo systemctl status vscodeserver
---
Jul 13 07:20:14 devserver001 code-server[367393]: Server bound to 127.0.0.1:8000 (IPv4)
Jul 13 07:20:14 devserver001 code-server[367393]: Extension host agent listening on 8000
Jul 13 07:20:14 devserver001 code-server[367393]: Web UI available at http://localhost:8000/?tkn=6de5345a-b644-48cd-a7f9-3433bcc031e3
Jul 13 07:20:14 devserver001 code-server[367393]: [07:20:14] Extension host agent started.
Jul 13 07:20:14 devserver001 code-server[367393]: [07:20:14] Deleted from disk ms-ceintl.vscode-language-pack-ja /home/yourname/.vscode-server/extensions/ms-ceintl.vscode-language-pack-ja-1.67.3
Jul 13 07:20:14 devserver001 code-server[367393]: [07:20:14] Deleted from disk xdebug.php-debug /home/yourname/.vscode-server/extensions/xdebug.php-debug-1.26.1
---

The URL is http://localhost:8000/?tkn=6de5345a-b644-48cd-a7f9-3433bcc031e3 in this example. Please note this URL.

If you could not find of the line “Web UI available at” with the command “sudo systemctl status vscodeserver”, then use the command “journalctl –no-pager | grep -e ‘code-server'”. You can find the line “Web UI available at” around the time you started the vscode server.

Nginx set up

Nginx is configured with a reverse proxy, SSL, and Basic Authentication (or Client Authentication). The SSL files should have been obtained by Let’s Encrypt or somewhere. I will not explain how to obtain the SSL files here.

sudo apt install nginx

Below is the basic configuration file. This file should be set up according to your own environment. My server is used only by me, so I have kept the settings to a minimum.

sudo vi /etc/nginx/nginx.conf
---
user yourUser yourGroup;
worker_processes 1;
pid /run/nginx.pid;
include /etc/nginx/modules-enabled/*.conf;

events {
        worker_connections 50;
        multi_accept on;
}

http {

        sendfile on;
        tcp_nopush on;
        tcp_nodelay on;
        keepalive_timeout 3;
        types_hash_max_size 2048;
        server_tokens off;

        include /etc/nginx/mime.types;
        default_type application/octet-stream;

        ssl_protocols TLSv1 TLSv1.1 TLSv1.2 TLSv1.3; # Dropping SSLv3, ref: POODLE
        ssl_prefer_server_ciphers on;
        access_log off;
        error_log /var/log/nginx/error.log;

        include /etc/nginx/sites-enabled/*;
}
---

Preparation for Basic Authentication

sudo apt install apache2-utils
sudo htpasswd -c /etc/nginx/.htpasswd testuser
 => Enter the passowrd for testuser.

The following is the key configuration file of virtual host. The setting using Basic authentication for authentication.
You need to change server_name, ssl_certificate, and ssl_certificate_key in the file from below example.

# virtual host
sudo vi /etc/nginx/sites-available/vscodeFront
---
server {
    listen 443 ssl http2;
    server_name yourServerName.com;

    # SSL
    ssl_certificate     /etc/letsencrypt/live/yourServerName.com/fullchain.pem;
    ssl_certificate_key /etc/letsencrypt/live/yourServerName.com/privkey.pem;

    location / {
        auth_basic "Restricted";
        auth_basic_user_file /etc/nginx/.htpasswd;

        proxy_pass http://127.0.0.1:8000/;
        proxy_set_header Host $http_host;
        proxy_set_header Upgrade $http_upgrade;
        proxy_set_header Connection "upgrade";
        proxy_redirect off;

    }
}
---
sudo ln -s /etc/nginx/sites-available/vscodeFront /etc/nginx/sites-enabled/

If you want to use client authentication, the virtual host will be like below.

sudo vi /etc/nginx/sites-available/vscodeFront
---
server {
    listen 443 ssl http2;
    server_name yourServerName.com;

    # SSL
    ssl_certificate     /etc/letsencrypt/live/yourServerName.com/fullchain.pem;
    ssl_certificate_key /etc/letsencrypt/live/yourServerName.com/privkey.pem;

    # client auth
	ssl_verify_client on;
	ssl_client_certificate /opt/myCA/cacert.pem;
	ssl_crl /opt/myCA/crl.pem;

    location / {

        proxy_pass http://127.0.0.1:8000/;
        proxy_set_header Host $http_host;
        proxy_set_header Upgrade $http_upgrade;
        proxy_set_header Connection "upgrade";
        proxy_redirect off;

    }
}
---

After configuration, enable the virtual host configration and restart Nginx

sudo ln -s /etc/nginx/sites-available/vscodeFront /etc/nginx/sites-enabled/
sudo systemctl restart nginx

Now you can access your vscode server from your browser.

The URL will be like https://yourServerName.com/?tkn=6de5345a-b644-48cd-a7f9-3433bcc031e3. The end of URL, after “?tkn=” , is from the URL that you note above.

Don’t forget to close port 8000 with the firewall of your server.